Wednesday, January 31, 2007

Binding goes on

Sometimes I think I am getting worse at this whole guitar building thing. I routed (is that a word) our the binding channels on the top and back. I think I am unhappy with the channels. I couldn't control the router as well as I expected, perhaps my router cutting blade is blunt. Nothing seemed to flow and in some places the cut going in one direction was a different depth that the other way.

I just felt clumsy and uncoordinated.

Initially I had planned to put a thin purfling line in between the maple binding and the soundboard. I don't trust my routing ablilties/equipment to make such a thin cut.


I used a chisel and made very small adjustments and a file to smooth out the edges. Then I went ahead and glued the binding onto the back. I used the LMI white glue. My blue painters tape seems to suffer an alergic reaction when it gets near LMI white glue.

I think it's on. I think the binding is in place correctly. I can't wait to get that tape off to take a look.

Either way, tomorrow I am going to the fabric shop to get that twill tape. I'm not taking the chance with the top.

Tuesday, January 30, 2007

Let the Pictures Tell the Story

I took a lot of photographs of my progress tonight. I took a leaf out of Ken Michael's book and followed his process on getting the neck set. I don't really understand what I have achieved but I think it worked out okay. Don't worry, I'm confused as well.

But first, here is today's poser photo. It's starting to come together.


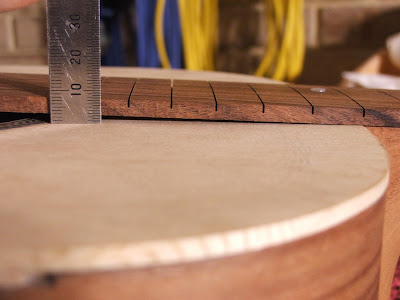
Okay, now for the neck set. I took a flat piece of pine and clamped it to the fretboard surface. The extension of the neck angle over the soundboard showed that there was a small gap at around the point where the fretboard will finish. I cut pieces of cardboard and stacked them up, until I felt some friction against pushing them in.


I then stuck these cards on the top of the neck's fretboard surface and lowered the neck joint so that the top of the cards were level with the sound board.


This is what it looks like once the cards have been removed.


Then I used a block which was half covered in sand paper to bring the soundboard down to the new level of where the neck meets the sound board. With me so far? Check out Ken's instructions if I am not making myself clear.

Any how, this is how it ended up, I sanded the soundboard down where the fretboard extension will come in contact with the soundboard and "blended" the area out to the soundboard. Obviously there is some final sanding to come still, you won't be able to tell.


So now when I return the original pine to the fretboard, the angle between the fretboard extension and the soundboard has been reduced. I can now barely get the cardboard underneath the pine.

Monday, January 29, 2007

Super Smooth Fretboards

My mate just bought a kit of his very own. A wood fire pizza oven kit. He asked me to come around and give him a hand. Now his kit weighs in at half a tonne. My back is sore and I’ve got twangs in muscles I did not know I had. I think I will stick to light weight kits.

Tonight, before the heat in the shed got to me, I used some 400 grit sandpaper to level down the inlay dots on the fret board surface. I am happy with the result, smooth and slick, but I maybe I should be concerned that the radius on the fret board may have changed. I can’t see it, I can’t feel it so I am not too worried.

Maybe I should go to a higher grit and look at giving the surface a polish. Can your fret board be too smooth? I guess there has to be some grip to a fretted string. Can’t say I have ever seen a well polished surface – there must be a reason.

Oh yer - the 14th fret marker is not centered. Shhhh don’t tell anyone. We’ll see what it looks like with 6 straight lines over the surface.

Sunday, January 28, 2007

More blood spilt

I don't get to play any of my guitars enough these days. Somewhat because I am always building but of late my left hand has suffered a decent injury each week. Today I sliced my little finger open on the sharp fretboard edge. I can't play but I can build.

Breaking every rule of building in relation to humidity, I had an interesting evening in the shed. When the temperature dropped enough, I braved going down to the shed. As I worked a huge thunder storm rolled in off the ocean, lightening claps and thunder bolts followed by some serious rain and then - the power went out. I considered working under candle light but then thought better off it.

Maybe it was the lightening, but I am having some troubles with my digital camera, most of the photos I took today are corrupt in someway, they have squiggles across them etc and are no good. Only a few worked out.

I started on the fretboard when the power came back on. I marked a centre line and then used the neck to rough out the shape, as I did with the Stewmac method. Then I used a plane to work roughly down to the final shape of the fretboard.

Then I turned the fret board over and put tape on the 5th, 7th, 9th, 12th and 15th frets so I could mark the places for mother of pearl fret markers. I used tape as a depth gauge on a 5mm drill bit, drilled the holes and then glued the MOP in with a little epoxy. In hindsight, I should have gone with gold mother of pearl dots. It won't make a huge difference but I have gold tuners and a gold inlay in the head plate (pending).


I have (I think) repaired the blue with the neck block, I bought some 8mm thick dowel from the hardware store, sanded it down to 7.5 and glued it in place. I made a template of the tenon with masking tape on which I marked a centre line and the position of the bolts. I then put the tape into the mortise and bingo, I had the places marked where the new holes needed to be drilled.

Tomorrow, I'll be re-reading the information about sanding down the area where the fretboard meets the soundboard. I am getting confused as what steps I need to take here. Do I have to make adjustments as I did with the stewmac neck?

I found Andy. One of us is having trouble with our email but it is all sorted out now and my "W" will be here very soon. One question I am left with is, where are you Greg? You haven't added to your blog in almost a month. Hope all is well.

Time taken : a few hours
Tools used : rulers, glue, files, chisels, plane, sandpaper, epoxy, drill press and bits
AU$'s spent : $1.50 for the dowel

Happy Australia Day

Sorry everyone, I've been busy celebrating Australia Day. I have received my reply from LMI;

Hi Ted,
I read your post on the forum and understand your concerns. We are going to change our packaging so that a large sticker on the neck block lets you know that you must trim it a bit prior to installing it. We could trim these ourselves prior to shipping the neck blocks, however that would limit those who would like a top thickness that is outside the norm.
At this point if you have already installed the neck block we recommend you dowel the holes and redrill them so that they align appropriately with the neck inserts.
Natalie Swango
General Manager
Luthiers Mercantile Int. Inc.


I am still left thinking that as I paid to have the top radiused as well as the for the serviced neck and block... I shouldn't have run into this problem. I am still just a bit sour over the whole situation. Still it is not the end of the world... I'll just have to move on.
At least the correspondence that David, I and others (I guess) sent has caused for the change that will help others that follow.

Thursday, January 25, 2007

Where's Andy

Has anyone seen Andy DePaul lately? On my Stewmac I ordered the pearl letter W from Luthier Supply.com and I wanted to put one on this one as well. I emailed Andy on the 9th and 21st of January. I tried again tonight and the mail came bouncing back.

I might have to find a new supplier.

In other news today, I received a quick email from Natalie Swango, the General Manager from LMI. They are looking into my plight and I look forward to hearing their comments tomorrow.

Wednesday, January 24, 2007

Like a Tail Chasing the Dog

Well, I've found the answer and I am not happy. I was thinking of calling this post "I just saved YOU some money!" because those that read it, and tackle an LMI kit, will surely appreciate that I've given you the heads up.

There is absolutely nothing wrong with my measurements or block settings, in fact I would say they are about perfect and reflect the effort that I put into getting them right. There is nothing wrong with my ruler, the plans or even the mortise and tenon joint.

My down fall has been my patience. My ability to not jump ahead. I had the answer the day the kit was mailed, I just didn't see it.

Inside a little plastic clip seal bag, LMI have included the bolts and washers required to attach the neck to the body. Also inside this bag is a piece of paper... (click to enlarge)


WHY!?!

Why would you put instructions on the need to trim the block AND tenon in a clip sealed bag, containing items which logically the builder is not going to use until he/she has glued the box shut?

LMI left a loose piece of paper in the kit with warning in relation to the truss rod why couldn't they do that with this notice. Why wouldn't they put it with the neck block, one of the first things that the builder is going to reach for?

I guess I am plugging the holes and drilling new ones. I just have to work out what will happen with the truss rod?

I'll ask LMI

Alright. I've taken my time, sat back and thought this through. I can not see anything that I have done wrong and I am starting to think that it may be an issue with the LMI neck.

Firstly here are the plans. You can see that they call for the over all length from the finger board surface to the surface where the heel cap is glued on is 97 millimetres, mine would be just a little longer than that, maybe 99 mill.


The plans give the length from the bottom of the fingerboard surface/top of the lid to the bottom of the back as being 100 millimeters.


Mine is 101 millimeters. Fine if you consider a good sanding of the top and back before finishing.


So as I did not trim or extend the neck block at all, I don't think that I have made any adjustments that would cause for the neck to be lower. It just can not be the block which has caused this problem.

That leaves the mortise and tenon and/or the location of the bolts (as it is a bolt on neck) that come through the neck block. Firstly the joint is very tight, there is little movement and the bottom of the the neck sits on the block.


Anyways, I have emailed the folk at LMI and they might be able to shed some light on what I of they need to do. As you can see, I am only a couple of millimeters away.

Monday, January 22, 2007

I need help - I've mucked something up

I am lost. Stressing about neck sets again. I've mucked something up.

I have the box closed and I've lightly trimmed the sides. I am vey happy with the results. The box has a big, deep "BOOM BOOM" when I tap it. It's louder, deeper and more sustained that the OOO or my F40.


With the box closed, I turned my mind to setting the neck angle before I do the bindings and before I attach the fretboard. And this is where my latest stress started. Robbie O'brien's DVD is confusing as he is building from scratch and the written words of Ken Michael and Bill Corey are all blurring in together and I am confused. Let me try and explain...

I have routed out the mortise, to remove the sides that covered the tenon. When I install the tenon (as it would to align up with the bolts) the finger board surface (where the finger board will attach) sits lower than the top of the guitar.

The tenon is tight within the joint and it feels like it is in the right place. It'd like the whole thing is set too low, the heel cap is lower than the back but if I was to raise the tenon with the friendly plastic as mentioned by Bill, it would mean that the bolts and the truss rod won't align.

Looks like I have the same problem as over on Mind Clutter

I don't get it, I just know I have mucked something up? I can't get away from - "You were s'pose to trim the neck block" but I'm sure I measured that.Help me if you can?


A lesser concern is that the veneer and the head plate did not attach 100% to the head of the neck, it is slightly lifted on one side. I am confidant that this only applies to the first few millimetres so I won't show when I shape the head.


My happy moment for the last few days was getting mydaughters to sign the top - the pau ferro was a bit dark for lead pencil. I also managed to sign and date it myself.

Saturday, January 20, 2007

Moving Right Along

I've been down in the shed again, working away and making some progress. After these photos were taken, I cleaned up the braces with sandpaper and then I installed three braces on the sides. On each side, I put a brace above each of the lower bout braces and then one in between the two upper braces (does that make sense). There was no plan to where I put them, just basically where they went on my OOO. I looked inside my old Yamaha F40 and there were none of these side braces.


Although I went slowly in routing the channels for where the braces meet the sides, they are still messy. I improve my technique with each build so in another ten guitars or so, I will have have a decent finish. I am just glad that the bindings cover these joins.


I forgot to introduce to you my greatest invention, my patent pending, technical guitar holding device. It is a plastic flower pot. It holds the guitar up off the bench so I can work underneath.


As I was lazy with the mold, I need to maintain the 508mm length over the body. I set the distance on the back by trimming the centre back strip so when the blocks were pressed up during the gluing process the overall length of the back is 508mm. I am using cauls and a long quick grip clamp to pull the top end of the blocks inwards to 508mm. I marked the top and cut the brace channels with the plan that the top will eventually glue up at the same length. If the top and the bottom are both at the same length, then the blocks have to be somewhere close to square. That's the plan.

Lastly tonight, I made a simple start on the neck. I glued the veneer and the head plate onto the neck.


Time taken :
Tools used :
AU$'s spent :

Friday, January 19, 2007

About to Close the Box

I am not spending as enough time on the computer of late. The brace work on the top is all but complete. I am up to the point where I take down the end of the braces that will not touch the sides and then a general cleanup.

One minor hurdle I did find is that the piece of wood supplied by LMI was not wide enough to cover the bridge reinforcement plate on the plan. In total there was only 5-10 mm different so I don’t think it is going to made a world of difference.

I’ve given up on this tapping idea. I can get the sound board to “ring” and then if I hold it in anther place, an inch away from the first point, the thud returns. I was thinking that I should hold it only where the cross brace would touch the edges as that will be a point where there will be little vibration at that point once attached to the sides. Then I thought, about how the tone would be affected by my fingers dampening the brace. At the end of the day, the braces are in the right location and they are somewhat visually pleasing. That’ll have to be the standard of my work until I’ve built a hundred or so and I can start to notice the changes and differences.

Let me say this. Sharp tools are definitely the way to go. I took the advice, researched scary sharp and did some work on the tools. I have definitely reached a better result than when I was using the oil stone. I can’t shave the hair of my arms yet but the quality of my work is a lot better.

At the end of my last build the note to self read, “Need more light”. At the end of this one, I think it’ll be “Need super sharp tools”

The back is appears to be sound, on the right curve and in alignment. I am happy. I have even started thinking about starting the neck. I will start the finish on the body as soon as I can, let it get real hard before I start working on it.

Time taken : A few hours
Tools used :
AU$'s spent :

Tuesday, January 16, 2007

I don't get it

Tap tone? When I hold the top in the upper bout on the base side, I get a thud noise. When I hold it on either side in the lower bout, I can actually hear the ringing/vibration/sustain that everyone talks about.

Now, what is the bet? I will play around with the brace shapes and end up with a consistant "thud thud" everywhere.

Time taken :
Tools used :
AU$'s spent :

Monday, January 15, 2007

One Day

One day - I will learn how to sharpen tools. "You'll never cut yourself with a sharp knife" they say. I guess that applies to chisels as well. This afternoon I drove a chisel into my left index finger. I can still build but I won't be playing any guitars for a week or so... which is a shame because I am starting to get really happy with the set up on the OOO.

Today I pulled all the clamps off the side/back and cleaned up some of that glue squeeze out. That is another thing that I will have to learn how to do one day - clean up glue with out leaving a "snail trail" along the joint.

I glued on the finger braces and the top brace, I drilled the truss rod hole into the shoulder brace and then began shaping the ends of that brace. That was when the bleeding started.

I've also trimmed up the back so that it is only a about 5 mm proud of the sides.

I have come to the conclusion that I am NOT allergic to Pau Ferro

Time taken : A couple of hours
Tools used : Glue clamps, chisels, bandage, tape, Betadine, rulers, Dremel, StewMac Precision Router Base, pencils, sandpaper.
AU$'s spent : Nil

Sunday, January 14, 2007

Attaching the back

I've been away for the last few days and I've been thinking a lot about the building process. Then when I returned home and read David's progress, I am thinking that I should have built a mold and dishes as well. I am limited to the tools that I have access to and really wanted to keep the cost of this guitar down (a little). Next time I will borrow gear or have someone construct these steps for me. Hindsight is 20/20.

Anyway, I moved forward today and the back went on this evening, the glue is setting as we speak. Fingers crossed.

I've been thinking a lot about getting making some step to ensure that the blocks were square to each other. I don't think that the internal mold is making sure the this is achieved. In making the centre back brace I measured it out so that the overall length would be exactly 508mm as the plan states. In doing so I simply subtracted the width of the blocks and edges and removed that amount. Therefore when I push the blocks up against the back strip, I will have the exact length.

In an effort to keep the blocks square, I ran some 1/4 inch steel rods through the neck block and into a piece of scrap wood which I pressed up against the end block. b adjusting nuts on either side of the neck block, I could the guarantee that when I clamped the guitar length ways, the over all length could not be pressed in further than 508mm and the blocks should be somewhat square to each other...


It did not work...

I made three dry runs at getting all the clamps on. I propped the structure up onto an empty pot plant container, giving me room to work underneath as well. Here is a picture moments before the glue went on. The clamps are all numbered and the distances all set. In total there are 30 wooden (spool type) clamps and 9 standard clamps ready for action...


And here is the final result. I hope it all works out


Time taken :
Tools used :
AU$'s spent :

Monday, January 08, 2007

More brace work

Getting there. Slowly getting there. More and more brace work. I keep going sideways, just to get away from the brace work. This is where I am at at the moment, minus the finger braces which I have roughed out.


I acknowledge that it could be said that I am not blogging as well on this second guitar. I really appreciate the feed back that I have been getting from David and Greg as it reminds me that I might be not giving enough information to make an accurate record. Please shout out if you'd like to know something - or if I have missed a step...

Tonight, I started routing out the channels where the back braces meet the sides. I totally mucked up one of the back braces, hitting it too hard with the chisel and making it too thin. I also feel a lump around the blocks? I will have a look at that further tomorrow.

I flipped the sides over and glued the kerfing to the top rim, making a huge mess. Take note, the LMI white glue is thick when it is cold and surprisingly (not) much more fluid when it is warm.

Time taken : Five hours or so
Tools used : glue, chisel, Dremel, sandpaper... nothing new.
AU$'s spent : Nil

Saturday, January 06, 2007

Am I doing this right.

Let me tell you again, making braces take ages - you can quote me on that.

Yesterday, I spent most of the day at it. I have now completed the braces on the back. I followed Robert O'Brien's method. I glued the back strip in place and then placed my sides over the top, marking the blocks and measuring the lengths down to where the braces are. I used a T-square to mark where the braces go and then chiseled out the channels. Gluing them in place was not the easiest, not having a dish, I used the sanding curve as a support underneath - seems to have turned out alright.

I've been reshaping the cross braces. When I tapped the top, it was giving me a solid "thud" sound with no shape or life at all. When I compared my brace to the dreadnought brace that came with my Stewart Macdonald kit, I noticed that these current braces were thicker and taller... I shaved them down using a chisel, my Dremel and sandpaper. I've also worked on the shape of the longer braces in the lower bout. My feelings about the result are a little in different and time will tell. I am really starting to think that it is all hit and miss this brace construction. Even though I have spent hours reading, I still have no real reference point as to how I adjust or maintain a tone or sound. I some what blindly shape away, tapping the top and thinking "Does that sound brighter?" Time will tell.

Today I cleaned up the shed. It was cluttered and I was struggling to find things or have them at hand easily. I like my clean surroundings.

Time taken : a few hours.
Tools used : Chisels, Dremel, papers, clamps, knives etc
AU$'s spent : Nil

Wednesday, January 03, 2007

Cross Brace Done

Last night I glued my cross braces together. Somewhere I had heard of firming the join between these tow braces with epoxy. Some people use a piece of fabric and others, like Robert O'Brien use a small piece of wood over the top of the brace. I simply settled for the expoxy, no great reason just that this way the joint is guaranteed to be solid.

Today I glued the cross brace to the top with LMI white glue. Simply process and although the brace slid around a little on the glue, the fact that they were already glued together meant I could control both at the same time.

I bruised the cross braces a little with the tension of the clamps, nothing serious that I won't be able to sand out.

Time taken : 20 minutes
Tools used : Glue, clamps
AU$'s spent : Nil

Tuesday, January 02, 2007

Never Again

A word from the wise. Making all the braces takes ages. I spent most of today working away at making the braces and that's not even considering that I cut the brace blanks last week. For those that follow, keep in mind that you need to cut the two braces in the lower bout of the back a bit thicker than the plan suggests. Otherwise, by the time that you sand the radius into the brace, you'll have no thickness left over.


I think in total I have already spent about 6-8 hours on them. I mucked up the cross braces by trying to scallop them both... didn't click with me until I went to put the pieces together. Not all bad seeming as it is day one of the last Ashes test match.


Yesterday, I put in the end wedge. It wasn't really a hard process but I still managed to muck up my cuts. I don't really trust my saw work and the fence kept slipping, I ended up reverting to the old Stanley knife.


I'll show the end result once I have sanded the surface down - my scraper is now so blunt, I couldn't use it on anything.

So now I have all the braces radiused and the centre brace on the back glued in. I have the back radiused so soon I should me heading towards getting my soundbox closed.... then I can start stressing about the neck set, the head stock, the frets, the bridge and the... and the...

Oh yer. I also put the rosette into place. I was very disappointed with the channel that LMI had routed or maybe it was the thickness of the rosette itself. Either way, it took about half an hour of sanding to get the rosette to fit in. I am yet to take the blocks off, I hope it has worked out okay. I do think however that fo the money one spends on having "services" done, they should be accurate.

Time taken : lots-n-lots
Tools used : all the sharp things, all the blunt things and all the things that hold stuff still.
AU$'s spent : nil